Ergohaven Remnant programmable ergonomic keyboard
DEPRECATED:This has been superseded by the MoErgo Glove80 keyboard.NOTE: Check out the interactive layer map for this keyboard below!
This is my Ergohaven Remnant keyboard: specifically, it’s a 5-row and 6-column variant of the Dactyl Manuform that I’ve fitted with symbolic Ideogram keycaps, linear yellow key-switches, and enhanced firmware with legendary Miryoku design.

Video: Indicators for modifiers and layers using per-key LEDs.

Prior to this, I used a Dactyl Manuform 5x6 keyboard for a year, an ErgoDox EZ keyboard for 6 years, and a Kinesis Advantage keyboard for 11 years before that.
Review
Here is my review of this keyboard, as published on Ergohaven’s reviews channel.

I’m a happy customer of two Ergohaven keyboards: the Dactyl Manuform 5x6 (top in photo) from 2021 and the Remnant (bottom in photo) from 2022.
As a professional software engineer, I heartily recommend the Remnant to my colleagues and friends as my “end game” keyboard after having used an Ergohaven Dactyl Manuform 5x6 (split and contoured) for 1 year, a ZSA ErgoDox EZ (split but not contoured) for 6 years, and a Kinesis Advantage (contoured but not split) for 11 years before that.
In terms of aesthetics, the Remnant’s fine lines and starlight material stand out elegantly (like a tuxedo) in contrast to the Dactyl Manuform 5x6’s thick lines and muted colors (like a trenchcoat). This shows just how much Ergohaven’s 3D printing skill and product quality has improved over the past year.
In terms of acoustics, the Remnant resonates with a pleasing “thock” on most keystrokes (especially on the thumb cluster keys) and wholly eliminates the hollow sound of the Dactyl Manuform 5x6. To my ears, the Remnant produces a premium sound like those fancy modded keyboards you see on YouTube reviews.
In terms of design, the Remnant greatly improves upon the Dactyl Manuform 5x6 by reducing the overall height of the keyboard (low profile), removing two vestigial keys from the bottom row of the thumb cluster (they were difficult to reach and I only pressed central one with the metacarpal joint of my thumb anyway), and realigning the thumb cluster to make all 3 keys easier to reach.
In terms of firmware, the Remnant’s VIAL support makes it very easy for newcomers to remap their keyboard using a desktop app or Web browser. For advanced users, the Remnant also supports QMK natively, so you can still “qmk flash” your own custom firmware onto it. Notably, I’m able to use my custom QMK implementation of home row mods based on the bilateral combinations concept from the legendary Miryoku layout (which works beautifully with the Remnant’s 3-key thumb clusters, by the way) on both the Remnant and the Dactyl Manuform 5x6.
In terms of hardware, the Remnant features per-key RGB lighting, a powerful ARM processor with 62x more onboard memory (for tapdance, combos, macros, lighting effects and custom firmware), and most impressively a curved PCB that houses hot-swappable switches! This makes the Remnant significantly more reliable than my Dactyl Manuform 5x6, which was an early hand-wired version that unfortunately experienced some electrical disconnects over time (but thankfully they were simple enough that I could debug and re-solder them by myself).
Overall, the Remnant is an excellent upgrade from the Dactyl Manuform 5x6, and both Ergohaven keyboards are lightyears ahead of the status quo. I’m very happy with my purchases and to see the Ergohaven team improve so much! Thank you and best regards.
Layers
The keyboard boots up into the following default “base” layer when powered on. When held, the purple keys in the thumb clusters activate the subsequent layers according to the legendary Miryoku’s 6-layer design with 3-key thumb activation.
Interactive: Hover your mouse over the purple keys to see each layer!
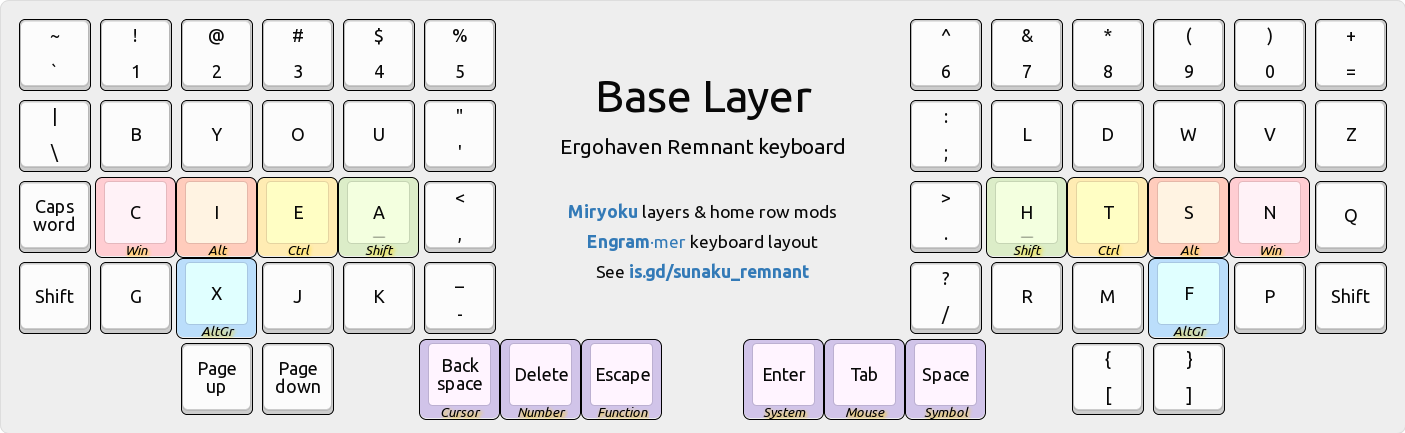
The keys are arranged in my variation of Arno Klein’s Engram 2.0 layout and they’re imbued with the legendary Miryoku home row mods tamed with enhancements.
Going beyond Miryoku, I have added custom “sticky layer toggle” functionality to the Shift keys of each Miryoku layer for times when I need use a layer for longer than a brief moment. For example, pressing Shift after activating a Miryoku layer with my thumb keeps that layer activated henceforth (thus making it “sticky”), allowing me to release my thumb off the Miryoku layer key. Similarly, pressing Shift again deactivates the Miryoku layer (thus making it “unsticky”) and sends me back home to the base layer.
Cursor layer

Arrow keys
The up/down arrow keys on the right-hand home row diverge from Vim’s HJKL order because it feels more natural to follow the inward-rising curve of the keyboard’s contoured keywell, which elevates the thumb above the pinky finger and, similarly, the middle finger (up arrow) above the ring finger (down arrow).
This is a longstanding preference that I formed 17 years ago, in my early days of using the Kinesis Advantage with the Dvorak layout, whose lack of HJKL provided the freedom to reimagine the arrangement of arrow keys on the home row.
Select & edit
Editing (index finger) and selection (thumb cluster) keys line the inner wall. This opposition allows for pinching, where selections can be followed by edits. For example, to copy everything, I would first tap the “Select all” key with my thumb and then pinch slightly inward to tap the “Copy” key with my index finger.
The copy and paste keys are stacked vertically, in that order, to allow the index finger to rake down upon them in a natural curling motion toward the palm. This order is also logical, since pasting requires something to be copied first.
The versatile “Select word/line” key at the thumb cluster’s home position is powered by Pascal Getreuer’s word selection QMK macro, which automates common selection tasks that require holding down Control and Shift with the arrow keys:

Tapping it selects the word under the cursor; shift-tapping it selects the line. Further taps extend the selection by another word (unshifted) or line (shifted).
Number layer

A 3x3 numeric keypad (using the standard 10-key layout) occupies the home block. The period and comma keys are positioned near the zero key on the thumb cluster. Square brackets from the base layer are replaced with parentheses for grouping.
Date & time
The slash and minus keys are positioned for MM/DD and YYYY-MM-DD date entry. Similarly, the colon key is positioned above them for HH:MM:SS time stamp entry.
:time stamp separator-ISO-8601 date separator/American date separator
Arithmetic
Common arithmetic operators pair along the sides of the 3x3 numeric keypad.
%and:for percentages and proportions+and-for addition and subtraction*and/for multiplication and division
Prefix signs
Signs that commonly prefix numbers line the top of the 3x3 numeric keypad.
~approximately#literal number$dollar amount@at the rate of
Inequalities
Comparison operators are positioned along the perimeter of the home block.
<less than>greater than=equal to~approximately
Function layer

The function keys are arranged in the same 10-key layout as the Number layer’s 3x3 numeric keypad so that you can develop common muscle memory for both layers. The remaining F10-F12 keys wrap around the home block because they’re found in shortcuts such as BIOS save/quit, fullscreen toggle, and devtools, respectively.
Symbol layer
This is the crown jewel of my keyboard’s configuration: an entire layer dedicated to the entry of symbols that are essential for computer programming. It’s the result of several hundreds of layout iterations over the last 8+ years.

👉 Red quotes. Green arrows. Blue groups. Purple flips. Yellow Vim.
\is on the thumb for escaping all other symbols without moving your hand.- For snake_case,
_is at the same spot as English’s most frequent lettere. - For assignment,
=is on the home row because it’s frequent in programming. - For strings, all quotation marks are located at the top of the home block.
- Bitwise
|&and arithmetic-+operators “flap down” and “fold up” together. - Angling arrows
->,=>,<=,<-; functional programming pipes|>,<|abound!
Base layer affinity
@is at the same relative position as theTabkey on standard keyboards. They pair well: the former denotes references and the latter expands them.!is on the same key asShifton the base layer: they both invert things.();sits just above the inward-rolling “you” sequence in the Engram layout.
Vim editor shortcuts
^and$are on the home row, for jumping to the start/end of current line.#and*are on the home row, to search behind/ahead for word under cursor.=is on the home row, to automatically indent current line or selection.{and}are on the home block, for jumping to previous/next paragraph.<and>are on the home block, for decreasing/increasing indentation.,and;are in proper order for previous/next repetition off/F/t/Tjumps.?and/are stacked vertically, to search behind/ahead for regex pattern.:is on the inner thumb key, for entering Vim’s command mode comfortably.%is on the outer thumb key, for jumping to cursor’s matching delimiter.
Adjacent key bigrams
#!for shebang lines in UNIX scripts.->for thin arrows in C, C++, and Elixir.()for parentheses..*for filesystem globs.*.for regular expressions.
Outer corner bigrams
These are easy to find because they’re on the outer corners of the keyboard.
!~for regular expression “not matching” in Perl, Ruby, and Elixir./*and*/for multi-line comments in C, CSS, and JavaScript.\/for escaped regular expression delimiters in Vim.~/for home directory paths in UNIX.?!for interrobang in English prose.
Inward rolling bigrams
();for zero-arity function calls in C and related languages.);for function call statements in C and related languages.()for parentheses..*for regular expressions.~/for home directory paths in UNIX.<-for assignment in R and in Elixir’swithstatements.->for thin arrows in C, C++, and Elixir.=>for fat arrows in Perl, Ruby, and Elixir.!=for “not equal to” value comparison in many languages.<=for “less than or equal to” comparison in many languages.^=for bitwise XOR assignment in C and related languages.|>for the pipe operator in Elixir.!(for negating a group in Boolean expressions."$for quoted variable substitution in Bourne shell.!$for last argument of previous command in Bourne shell.$?for exit status of previous command in Bourne shell.<%for directive tags in Ruby’s ERB and Elixir’s EEx templates.#{for string interpolation in Ruby and Elixir.#[and
Movement keys are located centrally in the home block, resembling WASD keys, and mouse acceleration controls are poised for pinky finger access, so you can independently move the mouse pointer and also change its speed at the same time.
Mousewheel down/up keys are also placed on the home block, specifically on
the same keys as J/K (down/up in Vim) on the base layer for muscle memory reuse.
System layer

Keys for controlling RGB matrix settings line the central rows of home block, whereas keys for applying lighting modes line the perimeter of the home block.
Firmware
My keyboard’s entire firmware, as described in this article, is
available on GitHub in the sunaku_remnant branch of my personal
fork of QMK as well as Vial.
~/qmk_firmware/keyboards/ergohaven/remnant/keymaps/sunaku/
├── config.h
├── features -> getreuer/features
├── getreuer/
├── keymap_config.json
├── keymap_footer.c
├── keymap_header.c
├── Makefile
├── README.md
└── rules.mk
Extra QMK patches
This configuration includes additional enhancements on top of the standard QMK:
- My enhanced bilateral combinations patch, used for Miryoku home row mods.
- Pascal Getreuer’s word selection QMK macro, utilized in the cursor layer.
QMK configurator app
You can upload the provided QMK Keymap JSON file named
keymap_config.json into the QMK Configurator app to view or
customize the keymap and all of its layers. When you’re finished, download the
keymap back to the same file, overwriting it.
Building the firmware
Navigate into the directory shown in the Firmware section above and run make to:
- Convert the
keymap_config.jsonfile into C source code. - Wrap the C source code with a custom header and footer.
- Compile the wrapped up C source code using
qmk compile. - Flash the compiled firmware (UF2 file) to the keyboard.
All these steps are handled by the provided Makefile, shown below for reference:
# NOTE: Don't name the QMK Configurator JSON keymap file as "keymap.json"
# because `qmk compile` directly translates it into C and compiles it too,
# thereby completely bypassing this Makefile and our keymap header/footer!

TOPLEVEL=`git rev-parse --show-toplevel`
KEYBOARD=ergohaven/remnant
KEYMAP=sunaku

all: flash

flash: build
	    qmk flash -kb $(KEYBOARD) -km $(KEYMAP)

build: keymap.c config.h rules.mk
	    test ! -e keymap.json # see comment at the top of this Makefile
	    qmk compile -kb $(KEYBOARD) -km $(KEYMAP) -j 0

keymap.c: keymap_config_converted.json keymap_header.c keymap_footer.c config.h
	    qmk json2c -o $@ $<
	    spot=$$( awk '/THIS FILE WAS GENERATED/ { print NR-1 }' $@ ) && \
	    sed -e "$$spot r keymap_header.c" -e "$$ r keymap_footer.c" -i $@

keymap_config_converted.json: keymap_config.json
	    sed 's|\("keyboard": *"\)[^"]*|\1$(KEYBOARD)|' $^ > $@

clean:
	    qmk clean

clobber: clean
	    rm -fv keymap.c keymap_config_converted.json
	    rm -fv $(TOPLEVEL)/$$( echo $(KEYBOARD) | tr / _ )_$(KEYMAP).*

.PHONY: clean clobber build flash